> ## Documentation Index
> Fetch the complete documentation index at: https://docs.fedapay.com/llms.txt
> Use this file to discover all available pages before exploring further.
# Plugins FedaPay
## WooCommerce
Integrating FedaPay into your WooCommerce store is simple thanks to our dedicated WordPress plugin. Follow this guide to install and configure the plugin so you can start accepting online payments quickly.
You can download the FedaPay plugin:
* Directly from this [link](https://wordpress.org/plugins/woo-gateway-fedapay/)
* Or from your WordPress dashboard, go to **Plugins > Add New** and search for "FedaPay WooCommerce."
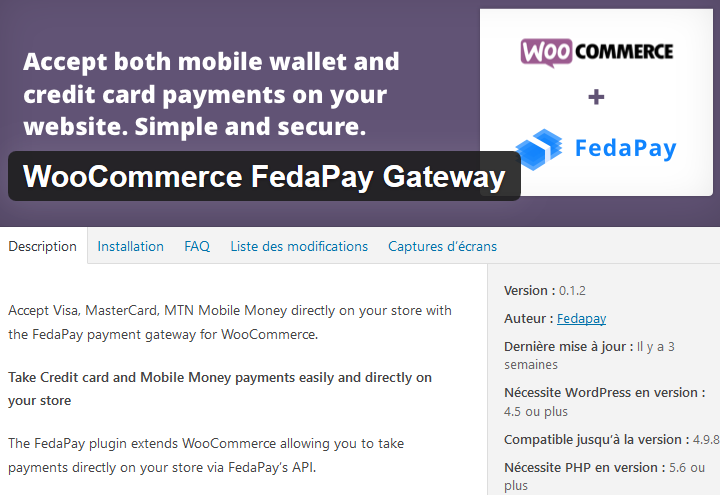
Once the plugin is installed, activate it by clicking on **Activate**. Then, go to the WooCommerce settings to finalize the configuration.
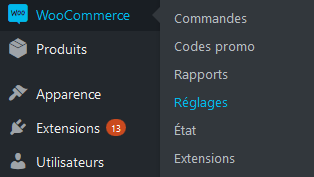
To configure FedaPay, go to your WordPress dashboard and click on:
* **WooCommerce**
* **Settings**
* **Payments**
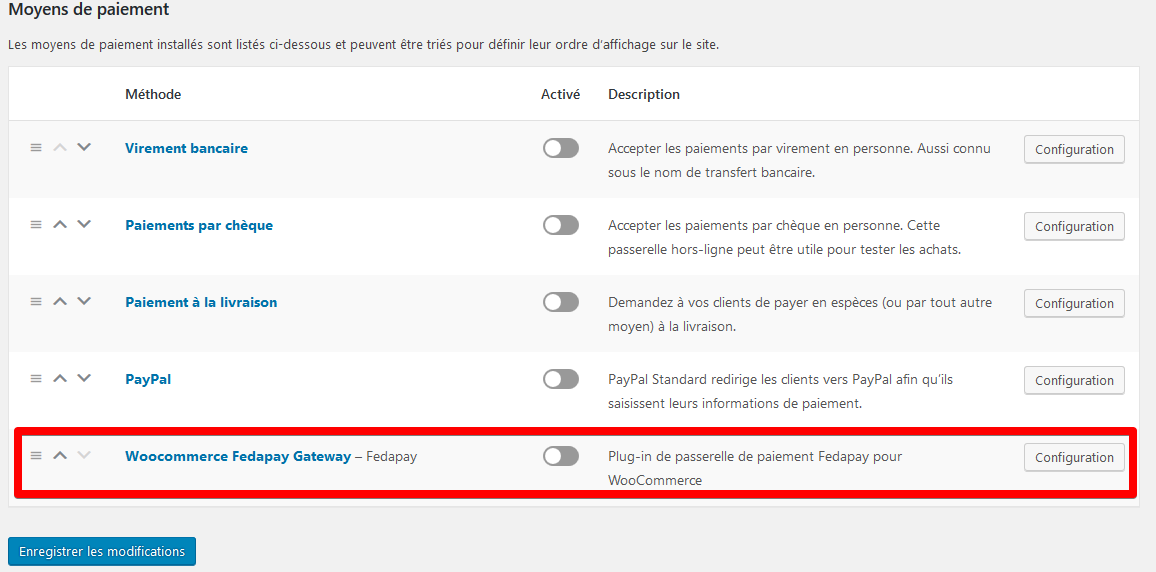
In this section, you will see all the available payment methods. At the bottom, you will find **FedaPay**.
Click on **Configure** next to FedaPay to open the configuration options.
Here are the key settings to configure:
* **Enable FedaPay**: Check this option to enable FedaPay and start receiving live payments.
* **Test Mode (sandbox)** : Check this box only if you are testing. Leave it unchecked when you are in live mode to accept real payments.
To use FedaPay, you need to enter your API keys (private) for both the test and live environments. Here's how to retrieve them:
1. Log in to your FedaPay account.
2. Go to your FedaPay **dashboard**.
3. Find the API keys for your **Sandbox (test)** and **Live (production)** accounts.
* The **live** mode private key starts with **sk\_live**.
* The **sandbox (test)** private key starts with **sk\_sandbox**.
4. Copy these keys and paste them into the corresponding fields in the WooCommerce settings.
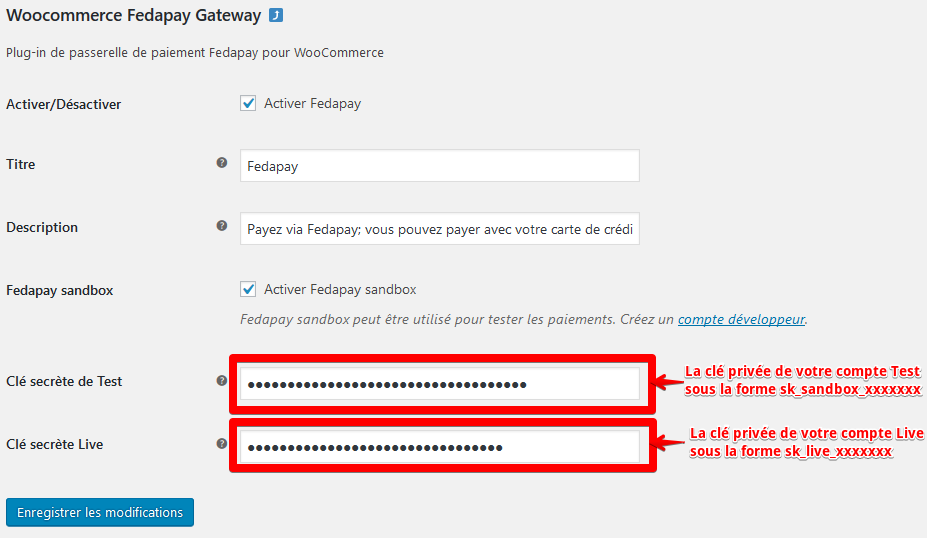
Once the API keys are correctly entered, click on **Save changes** to finalize the setup.
Congratulations, your FedaPay payment gateway is now configured and ready to accept payments directly from your WooCommerce store !
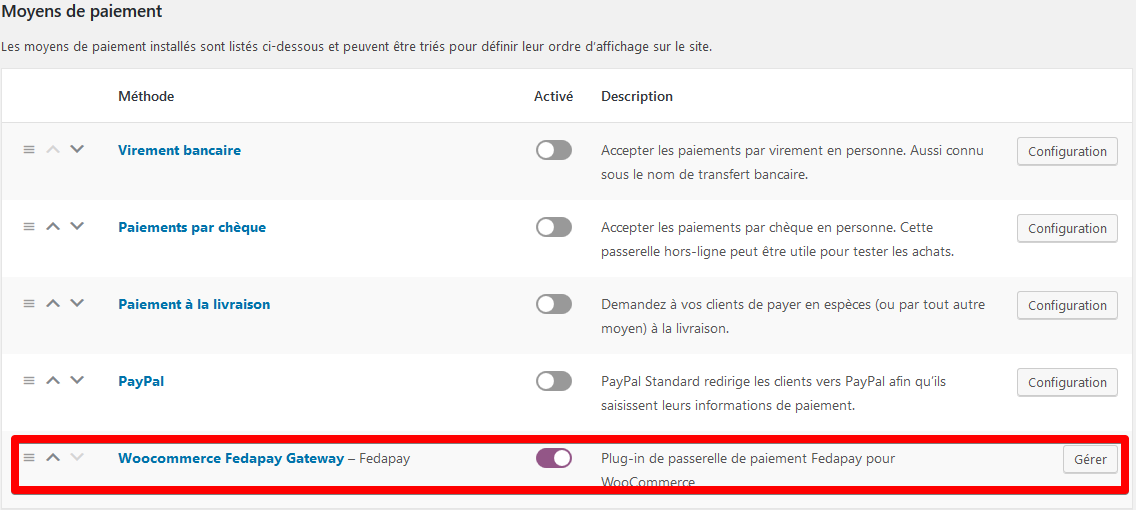
With these simple steps, you can now enjoy fast and secure online payments through FedaPay on your WooCommerce store.
## PrestaShop
Integrating FedaPay into your PrestaShop store is easy with our dedicated plugin. Follow this guide to install and configure FedaPay quickly, so you can start accepting online payments with ease.
You can download the FedaPay plugin for PrestaShop by clicking [here](https://www.fedapay.com/produit/plugin-fedapay-pour-prestashop/?v=ddd70bbaf5be).
**Installation Steps :**
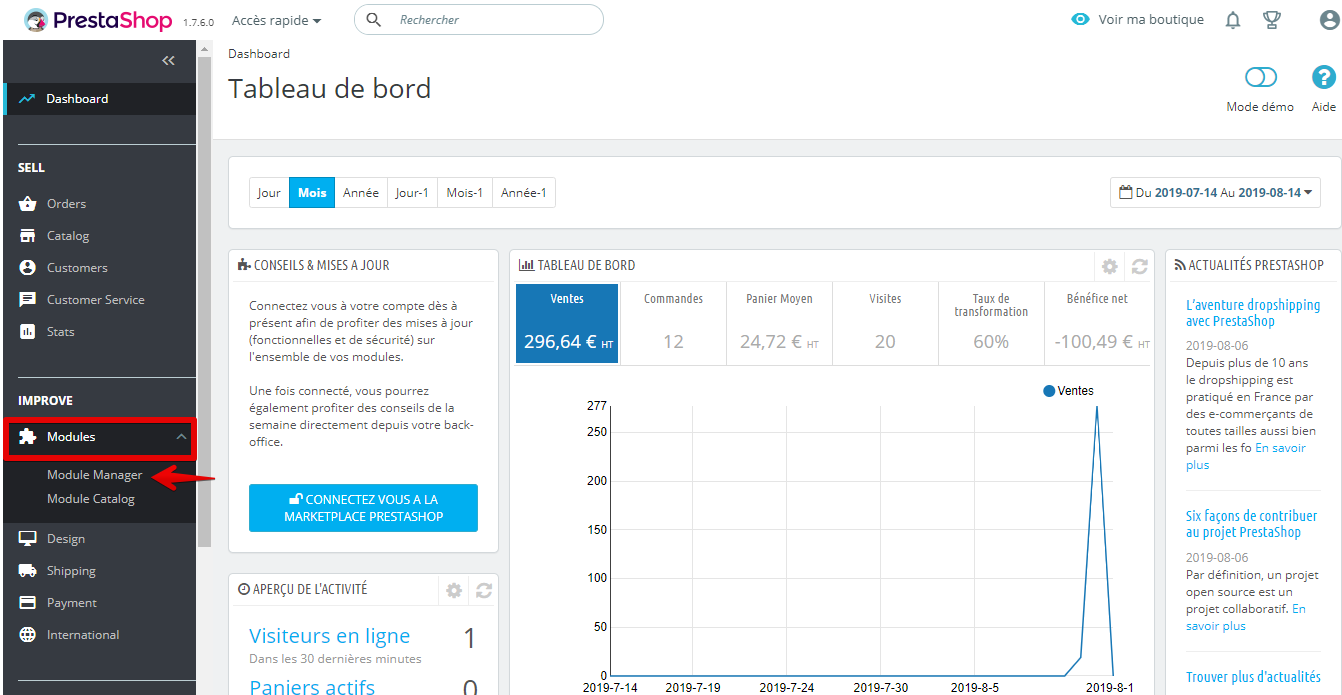
1. Go to your PrestaShop dashboard.
2. Click on **Modules > Module Manager**.
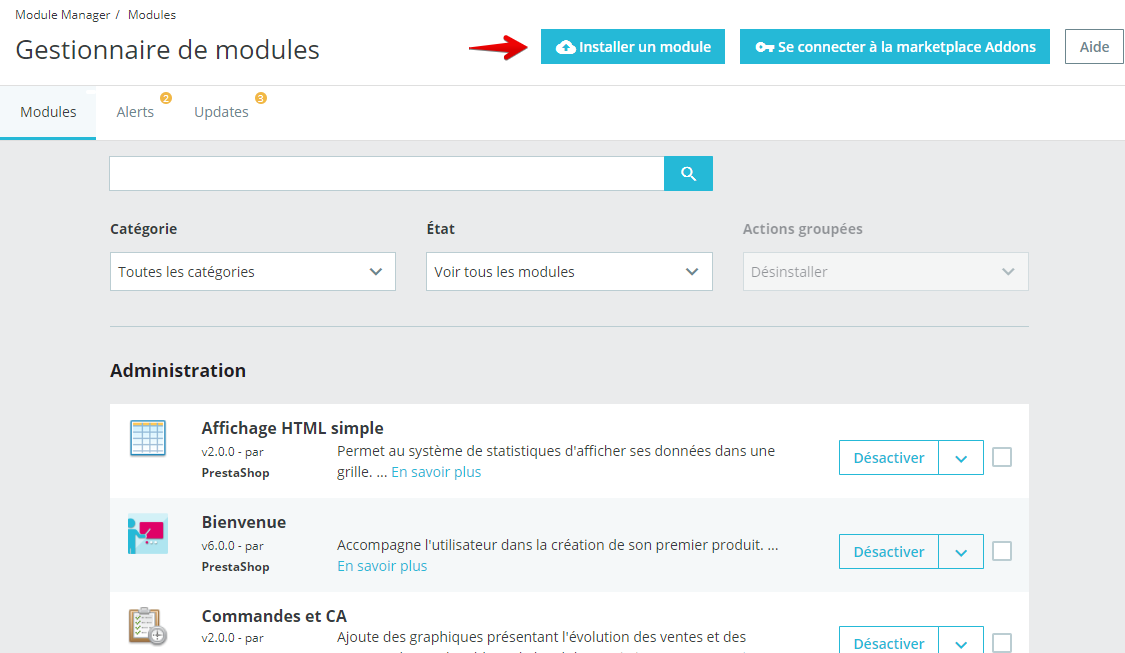
3. Click on **Install a module**.
4. Upload the plugin file you downloaded.
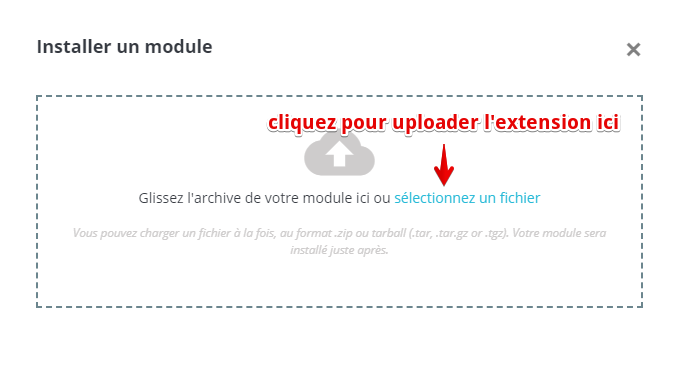
Once the plugin is uploaded, the installation will start automatically. You will receive a success notification once the installation is complete.
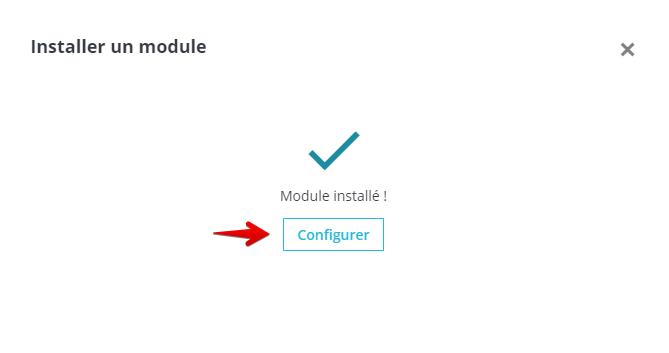
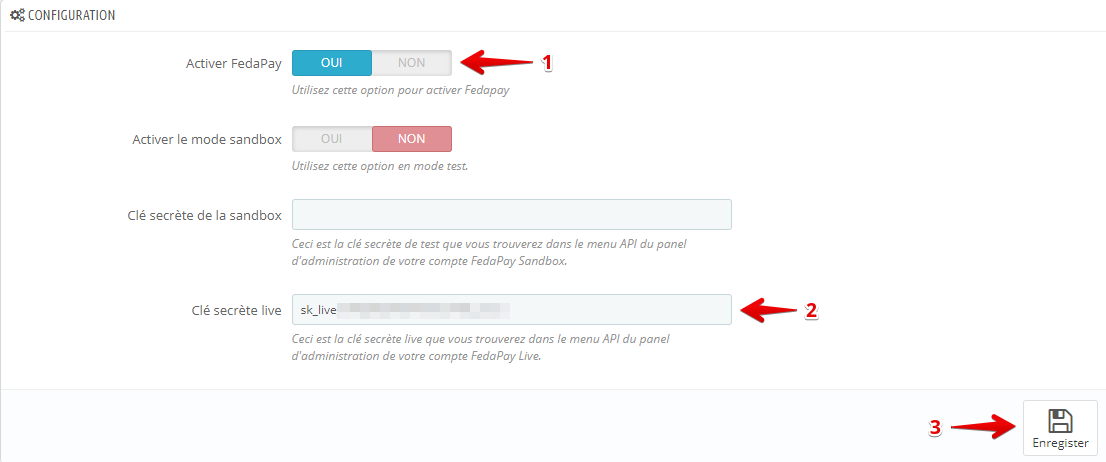
After installation, click on **Configure** to access FedaPay's settings.
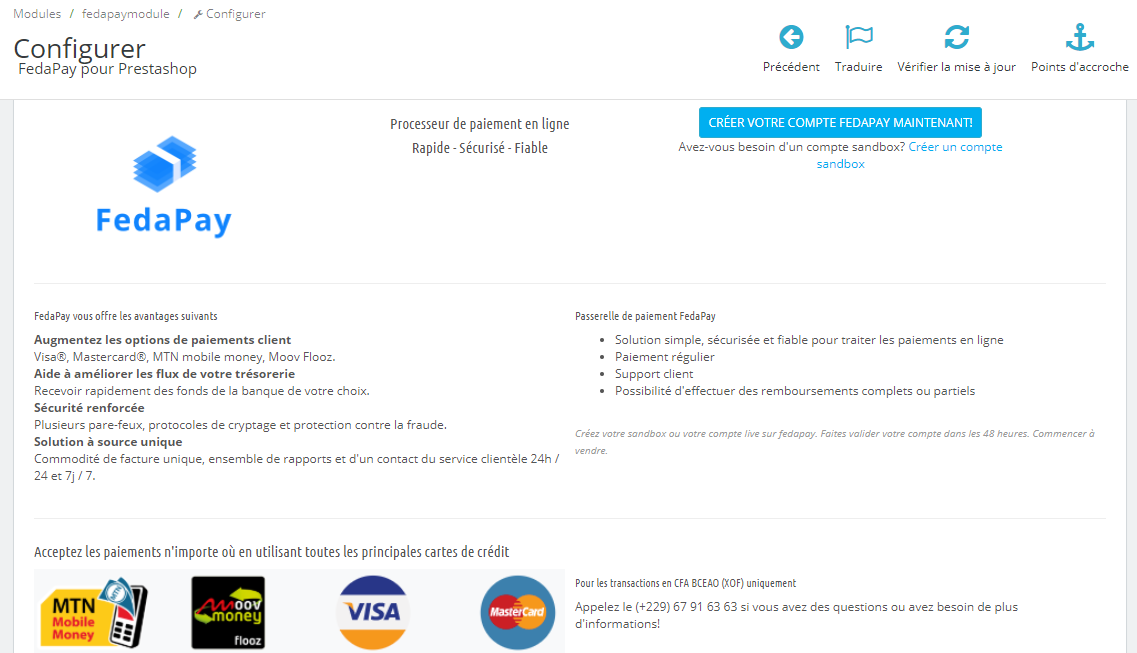
You can configure the plugin to work in either **Test Mode (Sandbox)** or **Live Mode** depending on your needs:
**Test Mode (Sandbox) :**
* Log in to your FedaPay **Sandbox account**.
* Go to the **API** menu and copy the test secret key (**sk\_sandbox**).
* Paste this key into the corresponding field in PrestaShop.
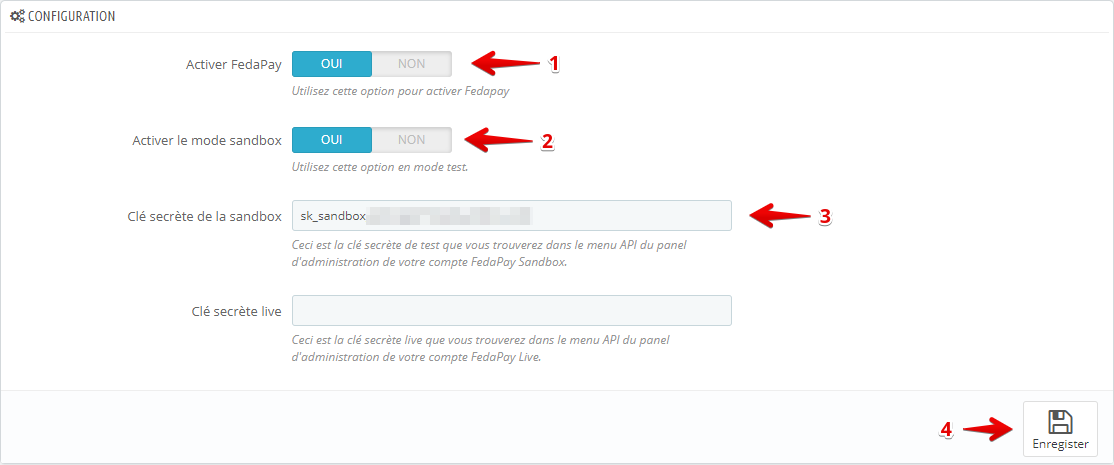
**Live Mode :**
* Log in to your FedaPay **Live account**.
* Go to the **API** menu and copy the live secret key (**sk\_live**).
* Paste this key into the corresponding field in **PrestaShop**.
FedaPay currently only supports FCFA, so you need to configure this currency as the default in PrestaShop.
**Steps to add FCFA :**
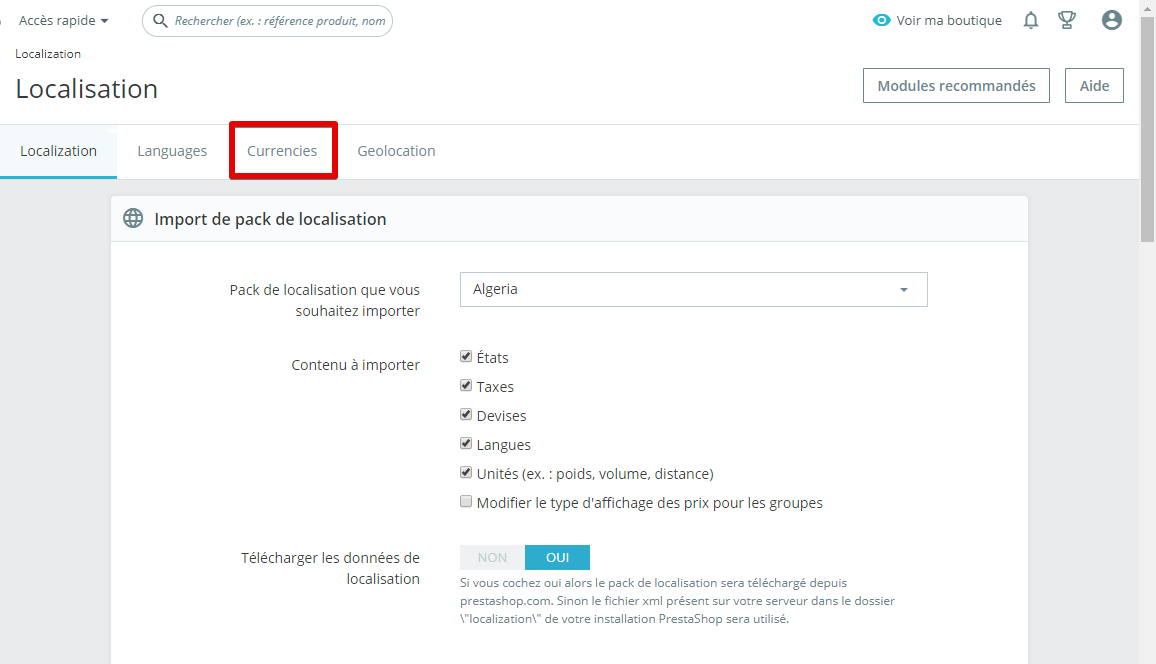
1. Go to **International** > **Localization**.

2. Click on the **Currencies** tab.
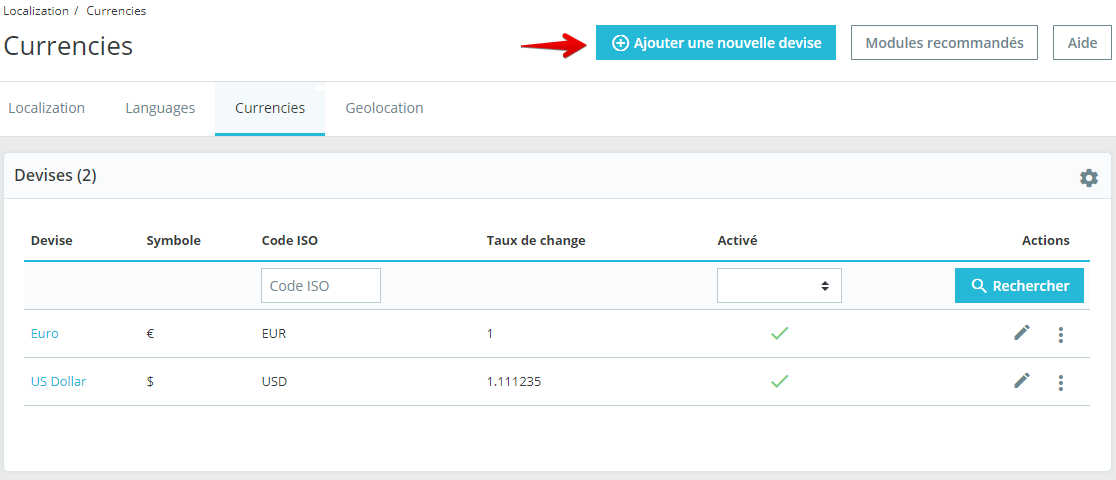
3. Click on **Add a currency**.
4. Select **FCFA** from the dropdown list.
5. Set the conversion rate to Euro (if needed).
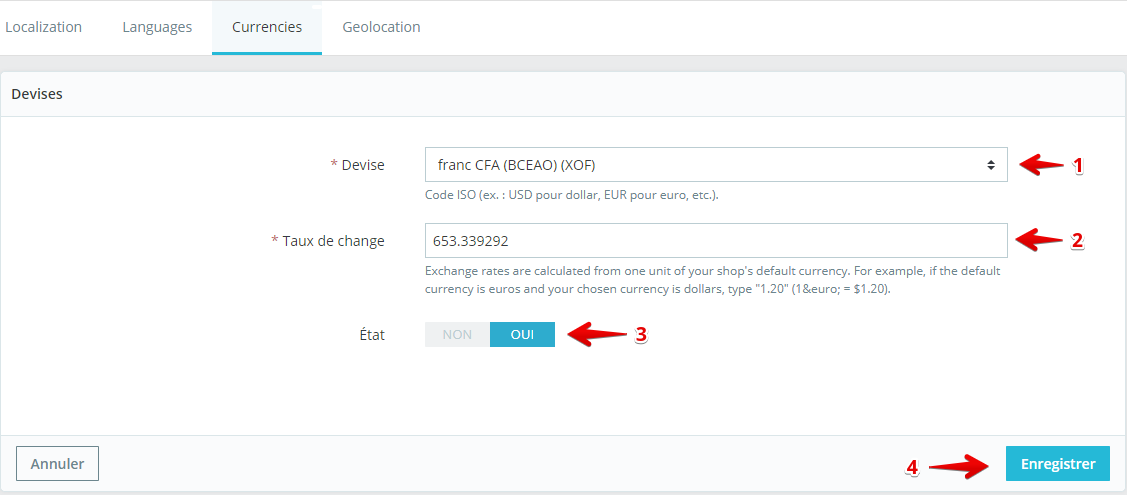
Once FCFA is added, it will appear in your store's currency list.

**Set FCFA as the default currency :**
1. Return to **Localization**.
2. Scroll down to the currency settings.
3. Choose **FCFA** as the default currency.
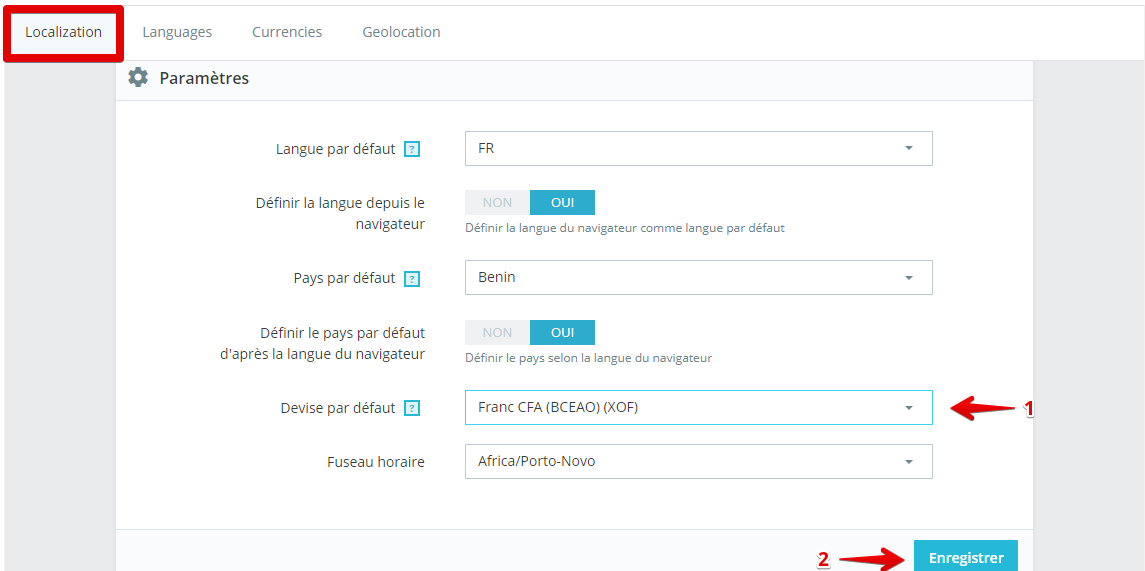
Once all the previous steps are completed, your PrestaShop store will be configured to accept payments via FedaPay.
## OpenCart
Integrating FedaPay into your OpenCart store is easy with our plugin. Follow these simple steps to install and configure FedaPay and start accepting payments.
Download the FedaPay plugin for OpenCart by clicking [here](https://www.fedapay.com/produit/plugin-fedapay-pour-opencart/?v=ddd70bbaf5be).
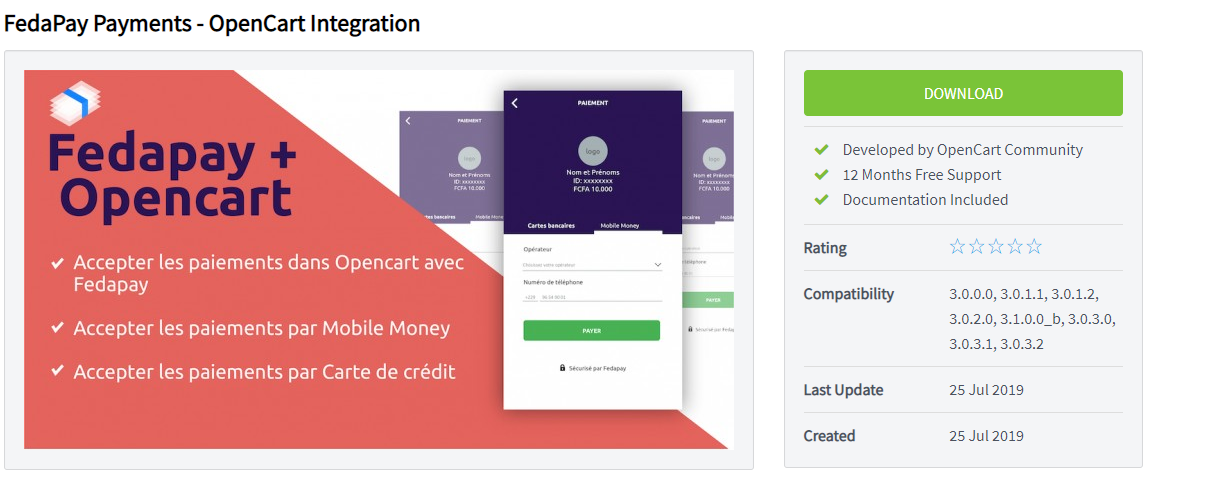
**Installation Steps :**
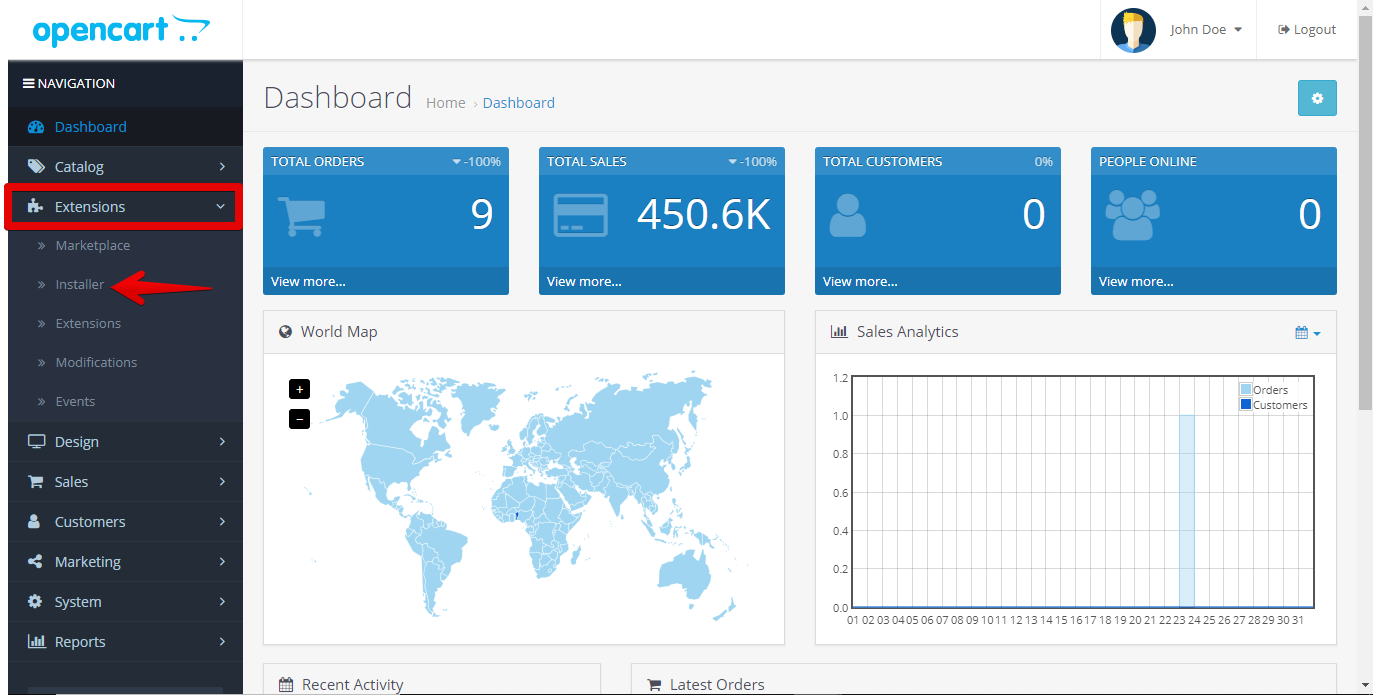
1. Go to your **OpenCart dashboard**.
2. Click on **Extensions** > **Install**.
3. Click the **Upload** button to upload the plugin you downloaded.
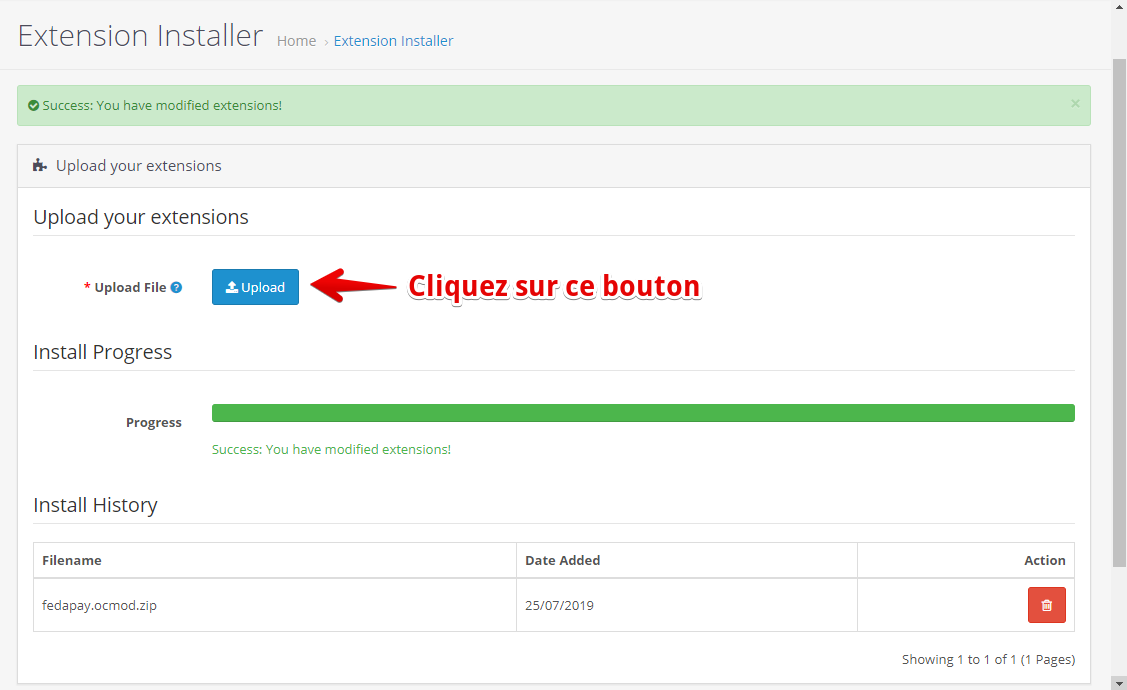
**Important**: Do not change the name of the plugin file (fedapay.ocmod.zip) during upload, or the installation will fail.
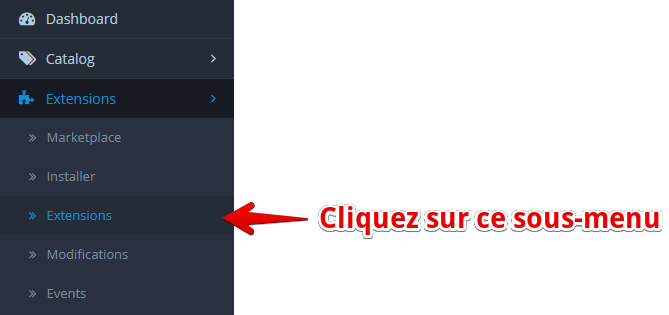
4. Once the upload is complete, click on the **Extensions** sub-menu to see the list of available extensions.
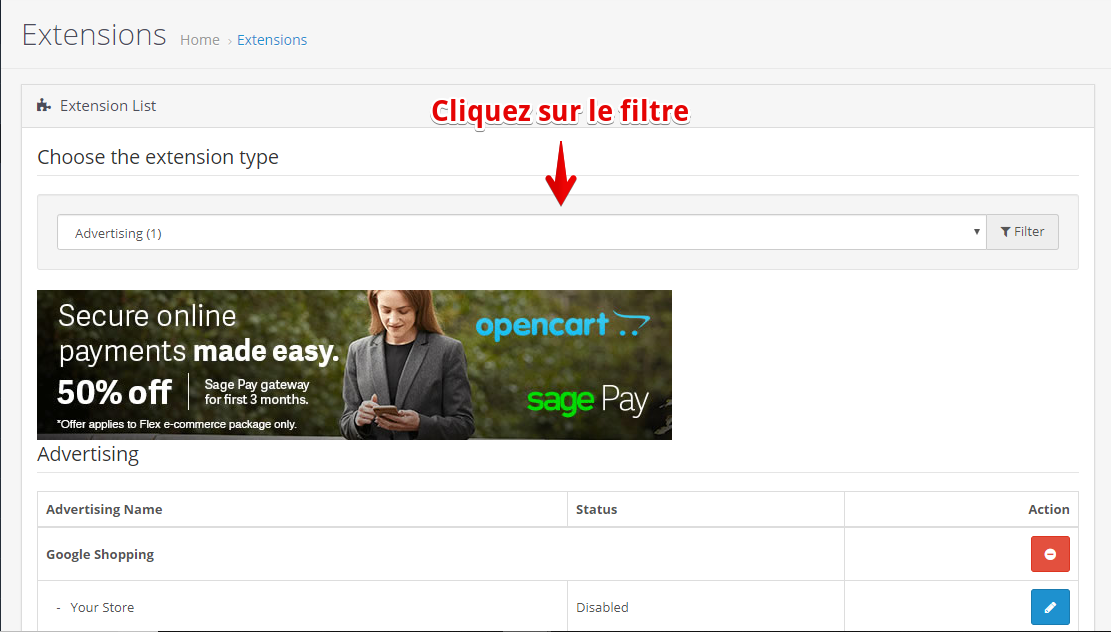
5. Filter by category **Payments**.
6. Find FedaPay in the list of payment methods.
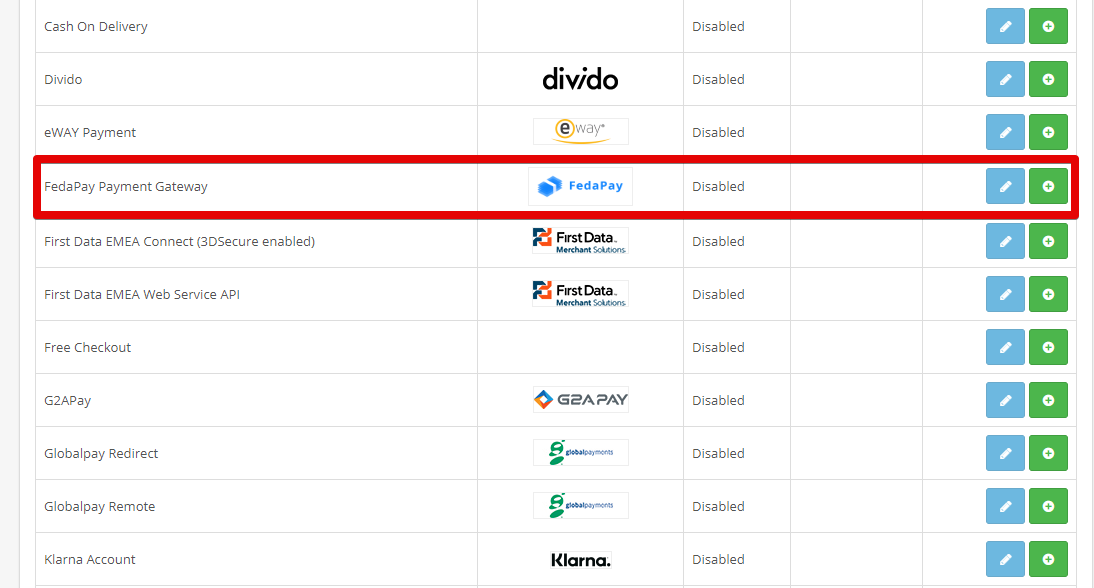
7. Click the green button to install FedaPay.

Once installed, you need to configure FedaPay to work with your store.
1. Click the blue **Configure** button to access FedaPay’s settings.

2. Enable FedaPay by changing the Status from "Disabled" to "Enabled".
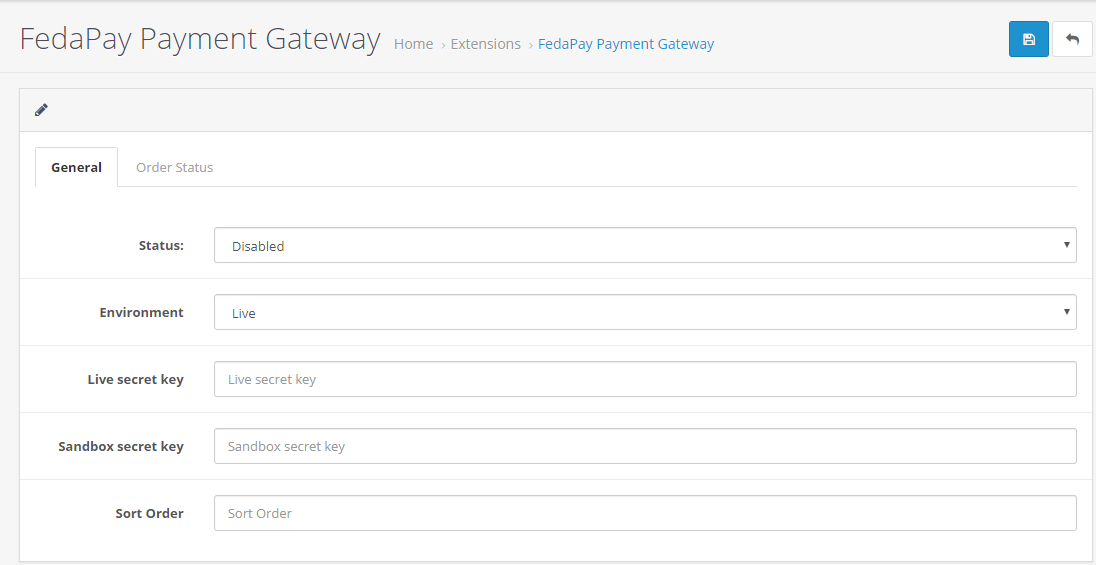
3. Choose the environment according to your needs :
* **Sandbox** if you want to test with a test account.
* **Live** to start accepting real payments with your FedaPay account.
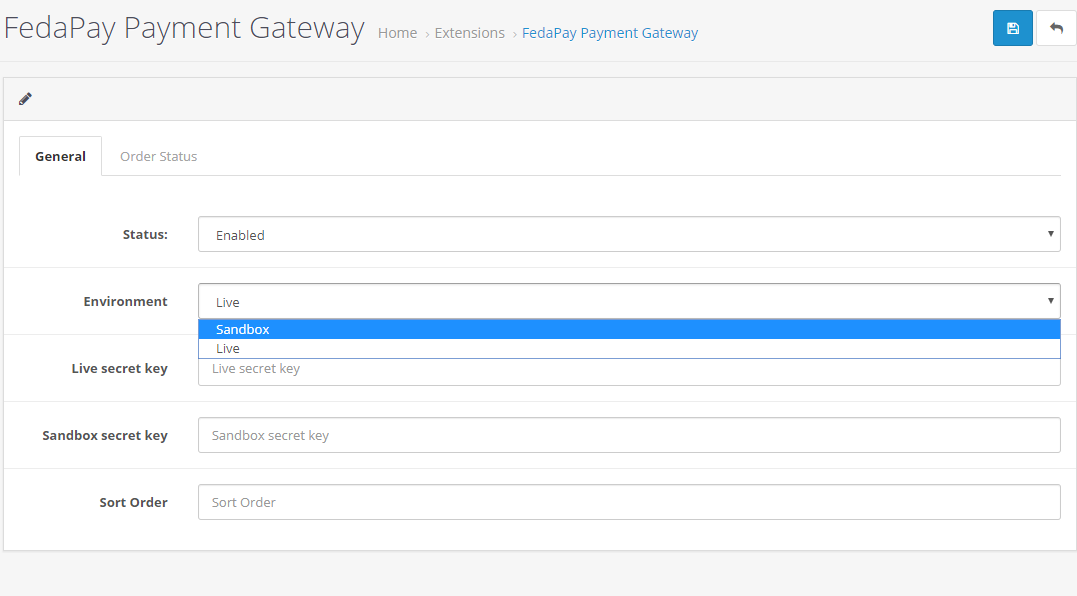
4. Depending on your selected environment, copy and paste the API secret key from your FedaPay account.
* If you selected **Sandbox**, copy the API key from your FedaPay Sandbox account.
* If you selected **Live**, copy the API key from your FedaPay Live account.
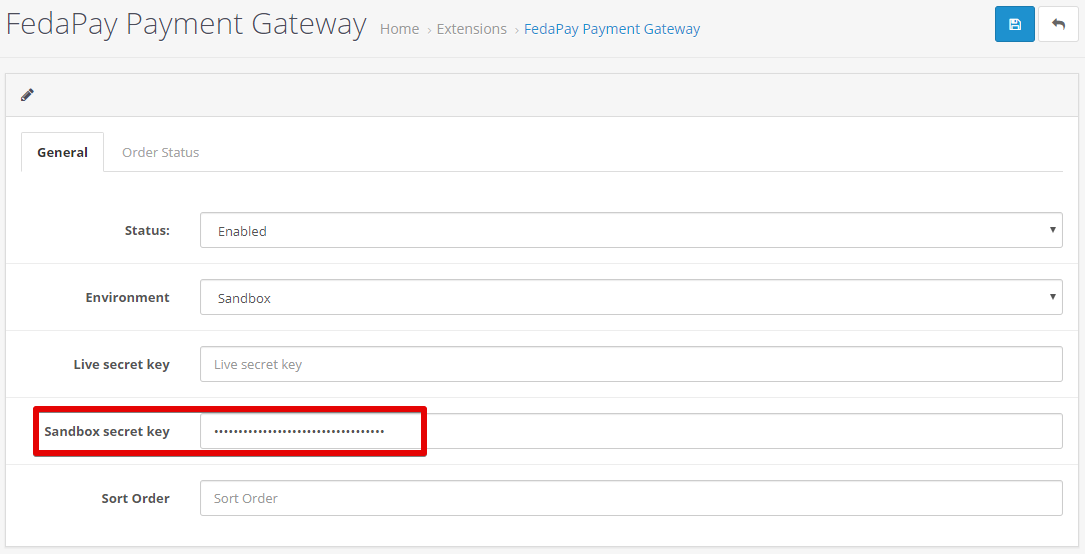
5. **Sort Order** : This field allows you to define the display order of FedaPay if you have multiple payment options. Fill in this field as per your preferences.
6. Click the **Save** button at the top right to save your settings.
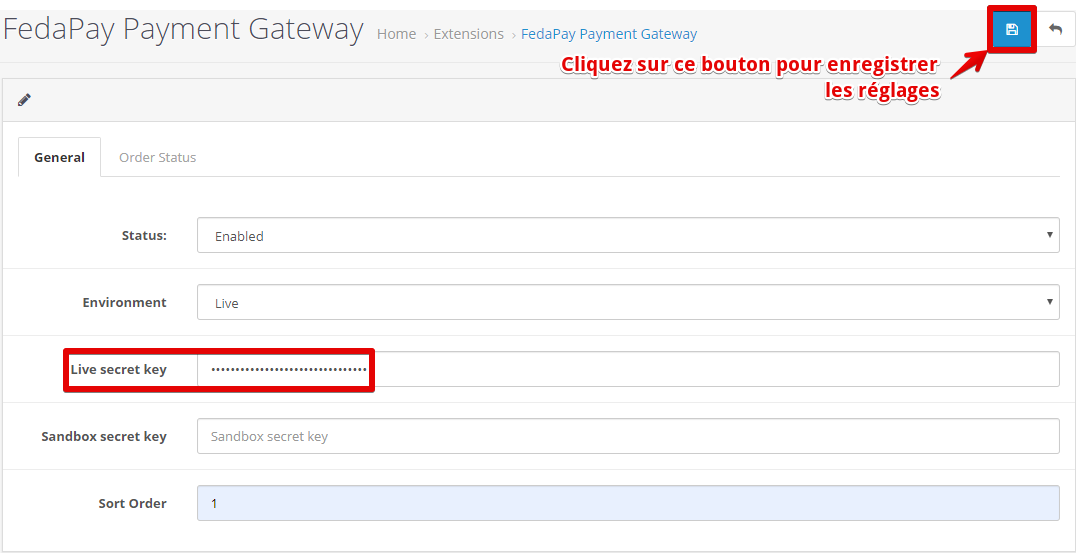
FedaPay only supports FCFA as the currency, so you need to add it and set it as the default currency.
**Steps to add FCFA :**
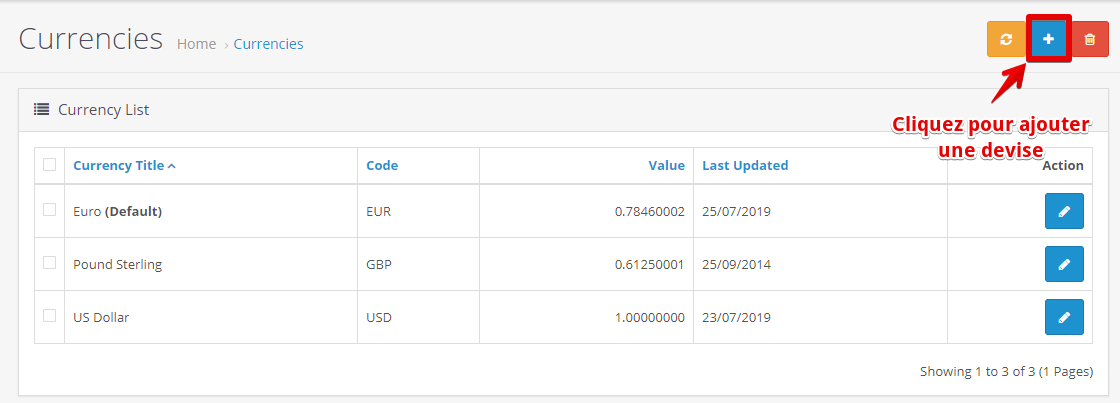
1. Click on **System** > **Localization** > **Currencies**.
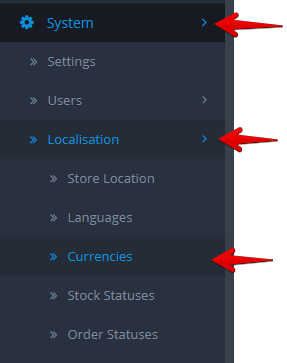
2. Click the blue Add a currency button.
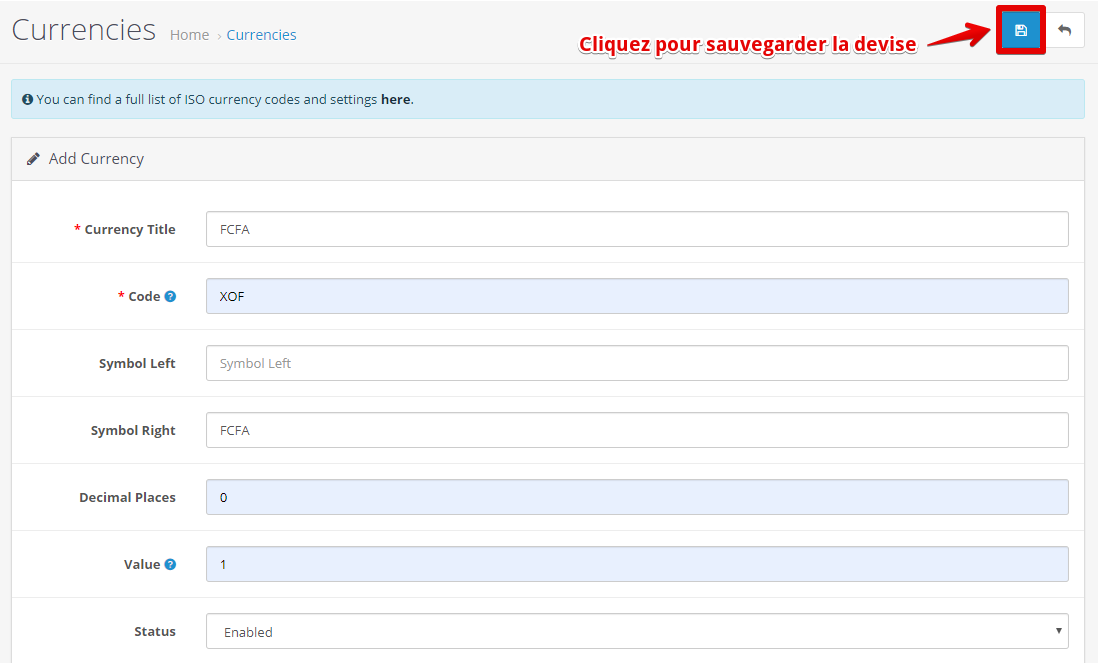
3. Fill in the information for **FCFA** (name, symbol, conversion rate) and save.
**Set FCFA as the default currency :**
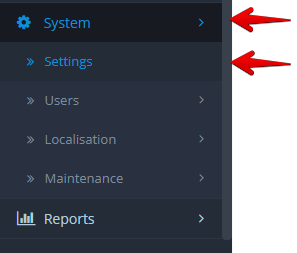
1. Go to **System** > **Settings**.
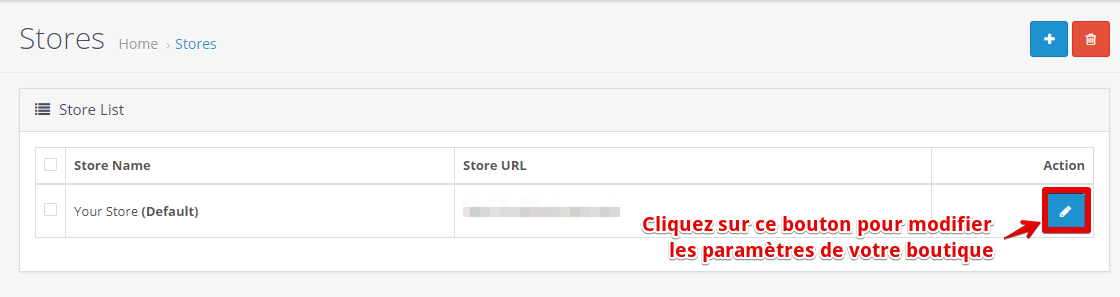
2. Click the **Edit** button to access your store’s settings.
3. Go to the **Local** tab, then in the **Currency** option, select **FCFA** from the currency list.
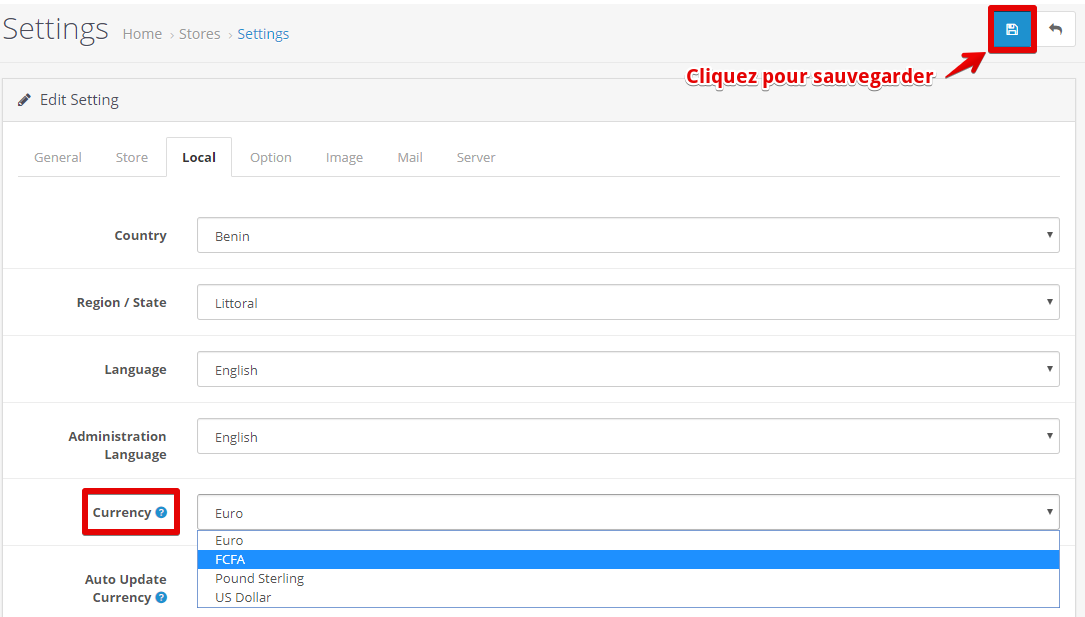
4. Click **Save**.
Your OpenCart store is now ready to accept payments via FedaPay !
## Feda Give Plugin Configuration for WordPress
With **Feda Give**, you can easily collect donations via Mobile Money and credit cards on your WordPress site. Follow this simple guide to install and configure the plugin.
Before starting, make sure to install two essential plugins :
1. **Give** – the main plugin for managing donations, available for free [here](https://wordpress.org/plugins/give/?utm_source=give\&utm_medium=marketing\&utm_campaign=download).
2. **Feda Give** – the FedaPay payment plugin for donations, available [here](https://www.fedapay.com/produit/feda-give/?v=ddd70bbaf5be).
Once both plugins are installed and activated, follow these steps :
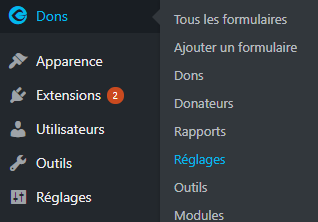
1. Go to **Donations** > **Settings** in the WordPress dashboard.
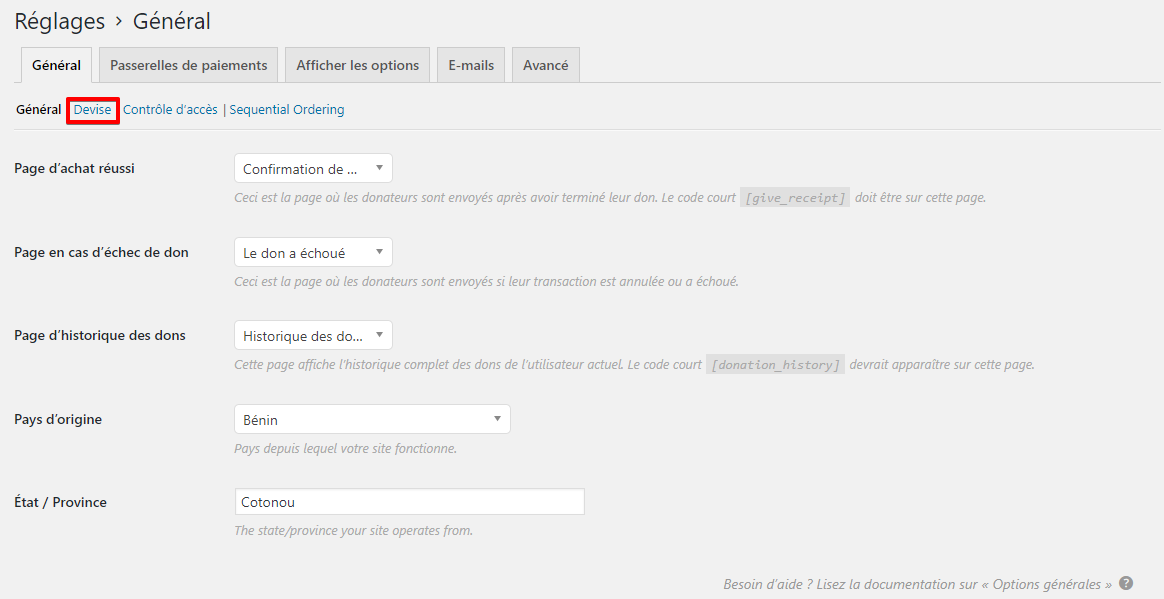
2. Click on the **Currency** tab in the General settings.
3. Set **FCFA (XOF)** as the default currency, as Feda Give currently only supports this currency.
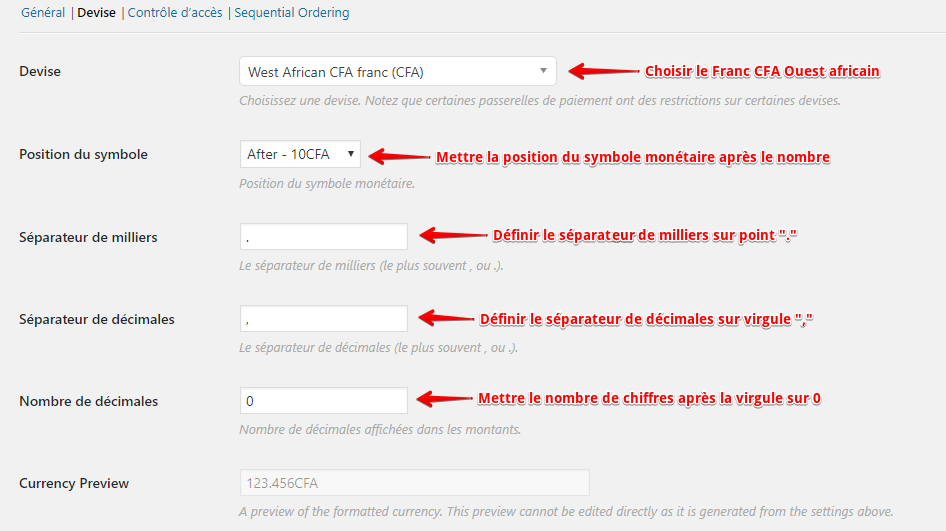
4. Save the changes.
After configuring the currency, activate FedaPay as a payment gateway :
1. Click on the **Payment Gateways** tab in the Give settings.
2. Check the box next to **FedaPay** to activate it.
3. Click on the **FedaPay** section that appears after activation.
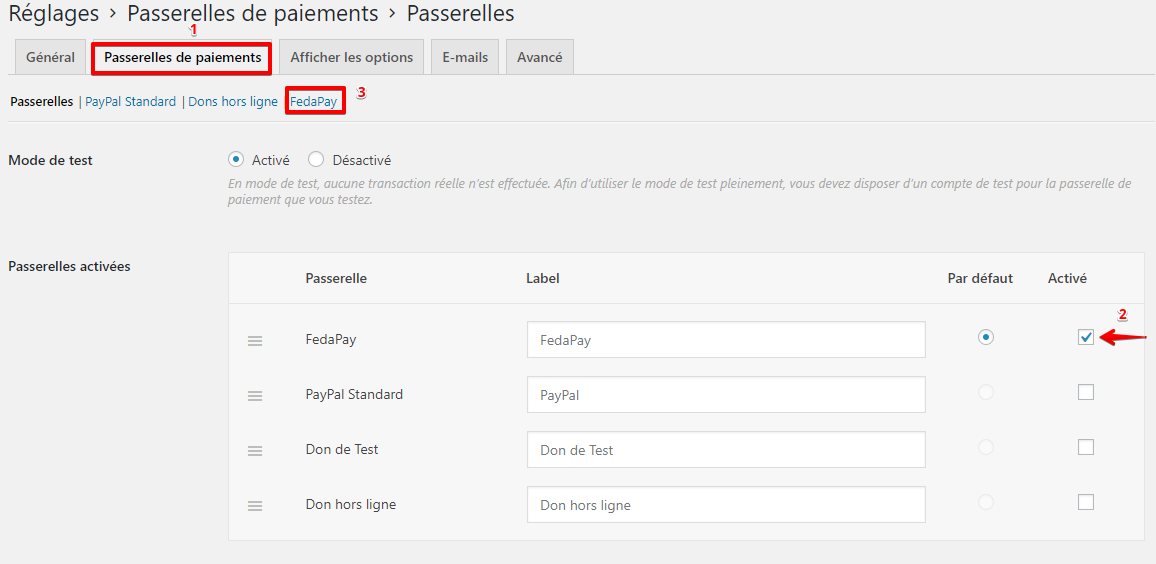
For FedaPay to work properly, you need to link your FedaPay accounts using your secret API keys.
1. Log in to your FedaPay **Sandbox** and **Live** accounts to retrieve the secret API keys:
* **sk\_sandbox** for your test account.
* **sk\_live** for your real (live) account.
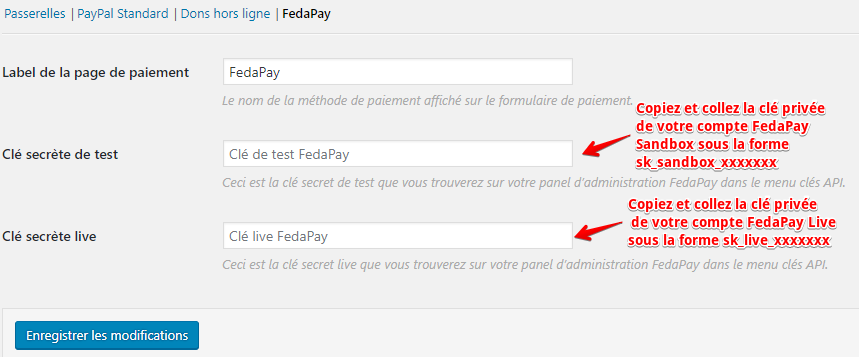
2. Copy and paste the secret API key for **test mode** in the corresponding field when using the test mode.
3. Do the same with the live secret API key to receive real donations once you’re ready to go live.
**Note**: Use the test key when the test mode is activated to avoid receiving real payments.
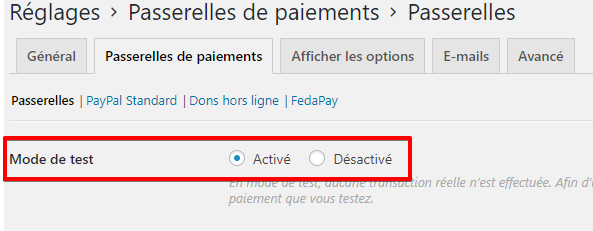
4. Save your changes.
Once the configuration is complete, you're ready to create your donation form.
1. Go to **Donations** > **Add Form** to create a donation collection form using Give.
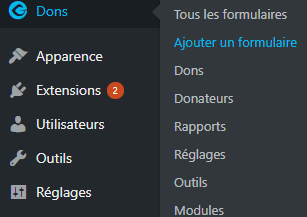
2. Customize your form as needed.
Your Feda Give integration is now complete! You can now collect donations via Mobile Money and credit cards on your WordPress site.
## FedaPay Plugin Configuration for WHMCS
**WHMCS** is a simple-to-use web hosting automation system. If you manage a web hosting site with WHMCS, **FedaPay** offers an integration plugin to collect payments easily. Here’s how to install and configure it.
Before starting, follow these simple steps to install the plugin:
1. **Create a FedaPay account** by signing up [here](https://live.fedapay.com/register).
2. **Download the FedaPay WHMCS plugin** available on GitHub [here](https://github.com/fedapay/whmcs-fedapay).
3. Once downloaded, you will need to copy the files into the appropriate folders in your WHMCS system.
**File Structure to Copy :**
```
modules/fedapay/
callback/fedapay.php
fedapay-php/
fedapay.php
```
* Copy the **fedapay-php/** folder and **fedapay.php** file into the **modules/gateways/** folder of your WHMCS installation.
* Copy the contents of the **callback/** folder into **modules/gateways/callback/**.
Once the plugin files are installed, follow these steps to configure FedaPay in WHMCS :
**Step 1: Access Payment Settings**
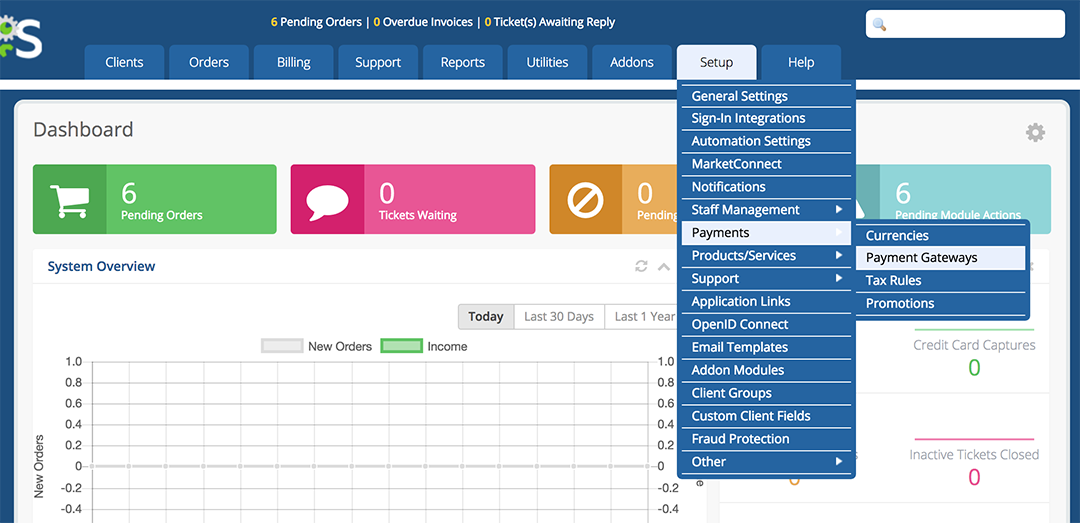
* In your WHMCS dashboard, go to **Setup > Payments > Payment Gateways**.
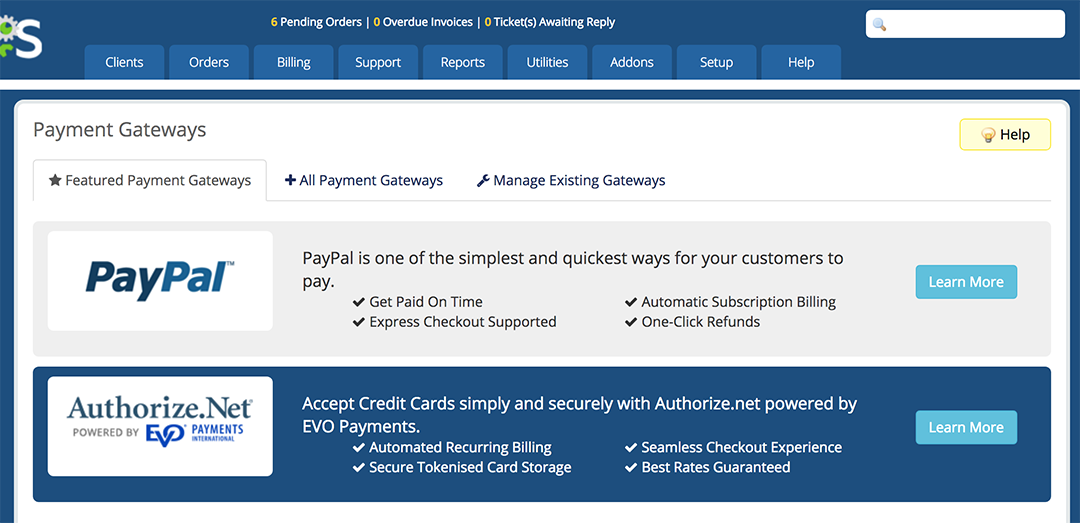
* Click on the **All Payment Gateways** tab to view the full list of available payment gateways.
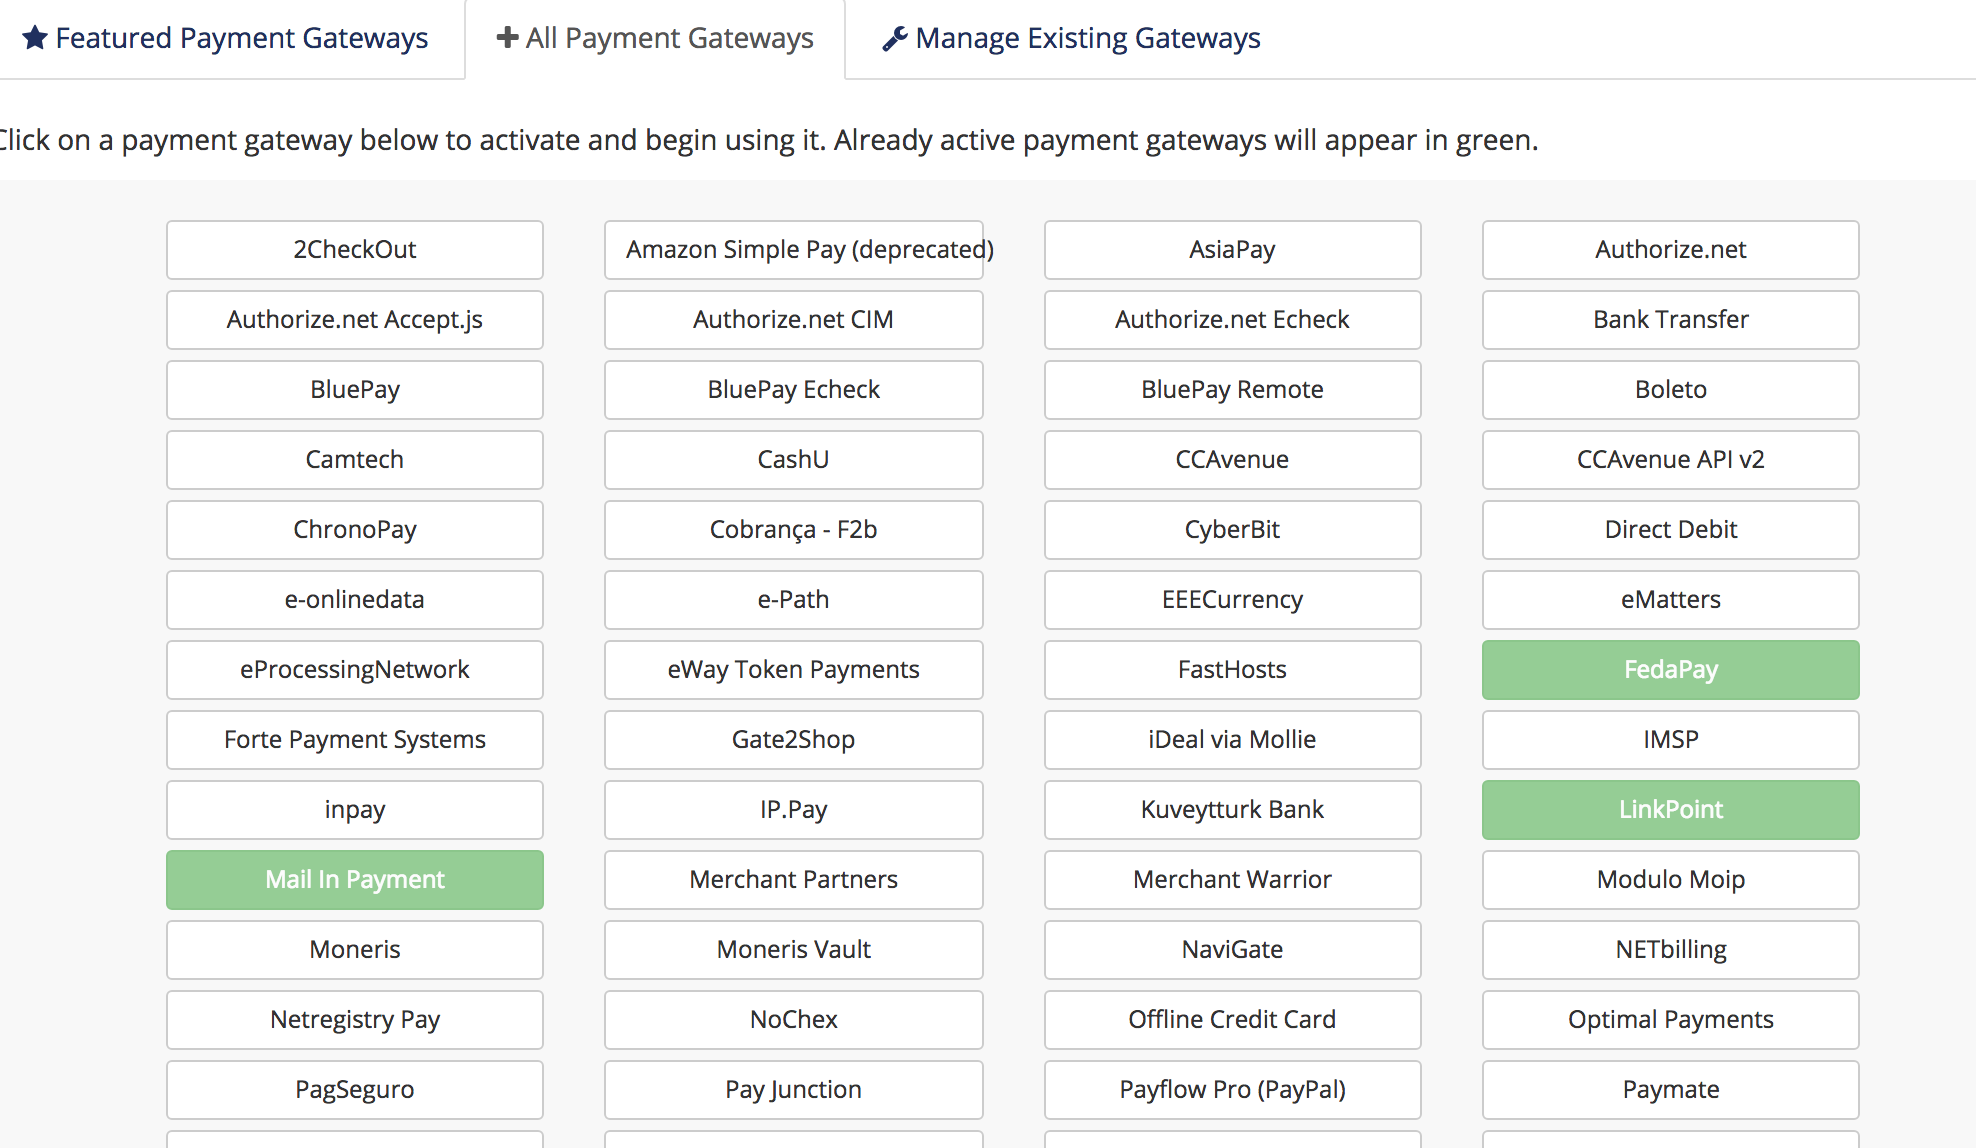
* In the list, select **FedaPay** to activate it.
**Step 2: Activate and Configure FedaPay**
* Check the box **Show on Order Form** to allow your customers to see FedaPay on the order form.
* If you are in test mode, check the **Sandbox Mode** box. Otherwise, leave it unchecked for live transactions.
**Step 3: Retrieve and Enter Your API Keys**
* Log in to your **FedaPay Sandbox** (test) and **FedaPay Live** (real) accounts.
* Copy the secret API keys for each mode:
* **sk\_sandbox** for the test mode.
* **sk\_live** for the real mode.
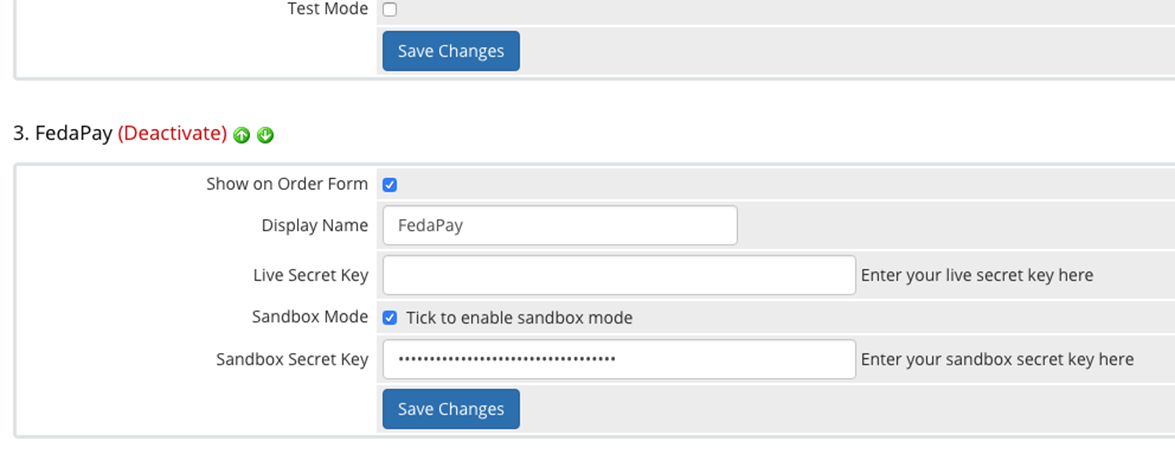
* Paste these keys into the corresponding fields in WHMCS.
**Step 4: Save Changes**
Click **Save** to save your changes.
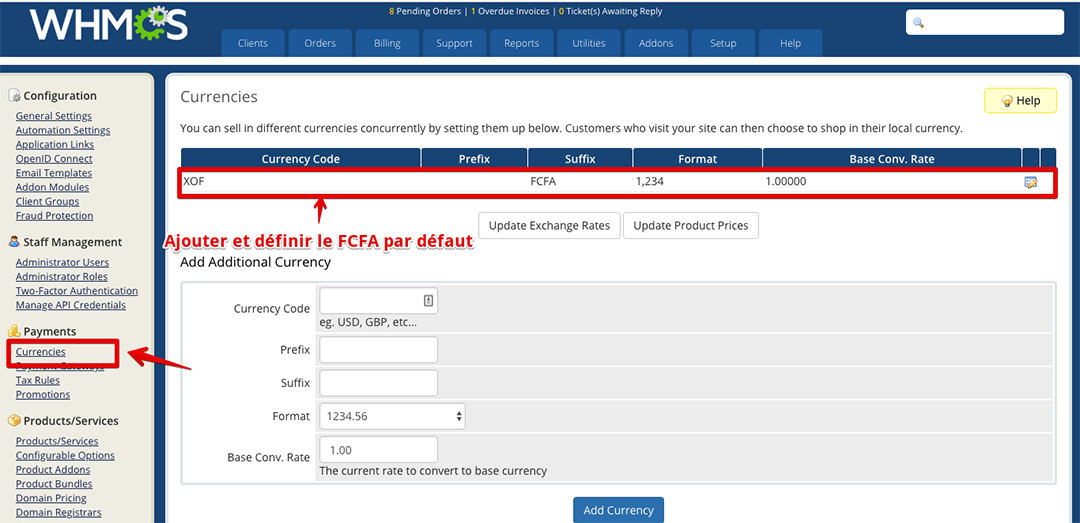
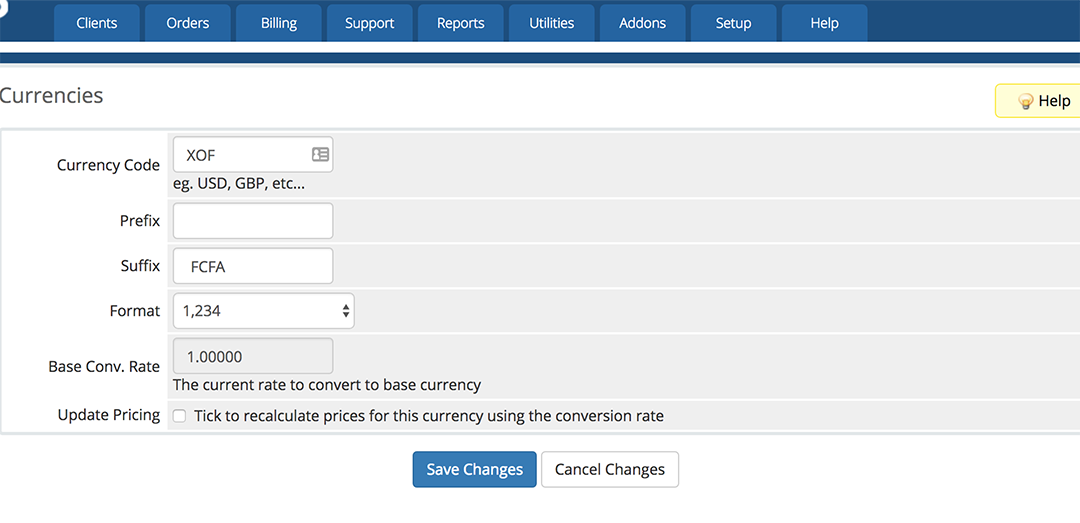
To allow your customers to pay in FCFA (XOF), you need to add this currency in WHMCS.
* In the **Payments** menu, click on **Currencies**.
* Modify the default currency or add XOF as a new currency.
You have now completed the FedaPay configuration for WHMCS. Your payment gateway is ready to accept payments via Mobile Money and credit cards.