> ## Documentation Index
> Fetch the complete documentation index at: https://docs.fedapay.com/llms.txt
> Use this file to discover all available pages before exploring further.
# Accept Payments with Checkout.Js
## Why Use Checkout.js for Online Payments ?
Checkout.js is a tool designed to make it easy to integrate a secure and fast payment form on your website. Whether you are a developer or not, this tool will allow you to collect payments directly on your site with ease. Learn how to use and customize Checkout.js to provide a smooth payment experience for your users.
***Before you start, watch this video that explains how to integrate Checkout.js:*** :
## Methods of Integrating Checkout.js
Checkout.js offers several integration options to suit different needs. You can add a simple payment button, multiple collection buttons, or even embed the payment form directly on your site to avoid redirects.
Start by adding a simple button on your page to trigger the collection. This button will allow the user to access a payment form where they can finalize the transaction.
```javascript theme={null}
Intégrer Feda Checkout à mon site
```
[Click here to test](https://demo.fedapay.com/payment-button.html)
You can customize the collection details (amount, description, customer names, and email address) to adapt the payment form to your platform.
```javascript theme={null}
Intégrer Feda Checkout à mon site
```
[Click here to test](https://demo.fedapay.com/customize-form.html)
To allow collections of different amounts, you can integrate multiple payment buttons on the same page.
```javascript theme={null}
Intégrer Feda Checkout à mon site
```
[Click here to test](https://demo.fedapay.com/add-multiple-buttons.html)
If you want to trigger the collection through a specific event, use JavaScript to activate the payment form on request.
```javascript theme={null}
Intégrer Feda Checkout à mon site
```
[Click here to test](https://demo.fedapay.com/trigger-collection.html)
For an optimized user experience, you can integrate the collection form directly on your site without redirecting the user.
```javascript theme={null}
Intégrer Feda Checkout à mon site
```
[Click here to test](https://demo.fedapay.com/payment-no-redirection.html)
## Customization of the Interface and Advanced Options
Checkout.js allows you to customize the visual elements of your form to match your platform’s identity. You can define the background color, the payment button text, or add a logo.
***Modify the appearance and add extra details:***
* ***Public key** : `data-public-key`*
* ***Collection amount** : `data-transaction-amount`*
* ***Collection description** : `data-transaction-description`*
* ***Currency** : `data-currency-iso`*
* ***Button text** : `data-button-text`*
* ***Button CSS class** : `data-button-class`*
* ***Widget image and description** : `data-widget-image, data-widget-description`*
## Method with a form tag for advanced integration
Checkout.js also allows integration with a form tag to send specific data after payment.
```javascript theme={null}
```
[Click here to test](https://demo.fedapay.com/form-tag.html)
## FedaPay Class Method and Configuration Attributes
***Checkout.js offers options to initialize the collection component with multiple configurations:***
* **Attribut HTML**: `data-public-key`
* **Type**: *string*
* **Description**: The FedaPay public key
* **Attribut HTML**: `data-environment`
* **Type**: *string*
* **Description**: FedaPay environment. Possible values are **live and sandbox**.
* **Attribut HTML**: `data-trigger`
* **Type**: *string*
* **Description**: The type of event that triggers the opening of the payment dialog box. Default value is **click**.
* **Attribut HTML**: `data-locale`
* **Type**: *string*
* **Description**: Payment interface language. The default value is **fr**.
* **Attribut HTML**: `data-transaction-id`
* **Type**: *integer*
* **Description**: If you have already created the transaction, you can specify the collection id.
* **Attribut HTML**: `data-transaction-amount`
* **Type**: *integer*
* **Description**: Transaction amount. Default value is **100**.
* **Attribut HTML**: `data-transaction-description`
* **Type**: *string*
* **Description**: Transaction description.
* **Attribut HTML**: `data-transaction-custom_metadata`
* **Type**: *object*
* **Description**: Transaction metadata object.
**Exemple JS:**
```
{
transaction:{
custom_metadata:{
foo: 'bar'
}
}
}
```
**Exemple HTML**
```
* **Attribut HTML**: `data-customer-email`
* **Type**: *string*
* **Description**: Customer email
* **Attribut HTML**: `data-customer-firstname`
* **Type**: *string*
* **Description**: Customer's first name
* **Attribut HTML**: `data-customer-lastname`
* **Type**: *string*
* **Description**: Customer name
* **Attribut HTML**: `data-customer-phone_number-number`
* **Type**: *string*
* **Description**: The customer's telephone number
* **Attribut HTML**: `data-customer-phone_number-country`
* **Type**: *string*
* **Description**: Customer's telephone country
* **Attribut HTML**: `data-currency-iso`
* **Type**: *string*
* **Description**: The currency iso code. Default value is **XOF**.
* **Attribut HTML**: `data-currency-code`
* **Type**: *string*
* **Description**: Currency code
* **Attribut HTML**: `data-button-text`
* **Type**: *string*
* **Description**: The text to be displayed on the payment slip.
* **Attribut HTML**: `data-button-class`
* **Type**: *string*
* **Description**: The payment coupon's css class.
* **Attribut HTML**: `data-form_selector`
* **Type**: *string*
* **Description**: override the form base selector. If this is specified, it will be used to find the form to be submitted after payment.
* **Attribut HTML**: `data-submit_form_on_failed`
* **Type**: *boolean*
* **Description**: Indicates whether the form (when the payment button or embedded element has a direct parent that is a form) should be submitted or not when the payment fails.
* **Type**:
```
function{ reason: number, transaction: object }
```
* **Description**: The return function when the dialog box is closed. This function takes two arguments. The first is the reason for closing the dialog box. It can be equal to FedaPay.CHECKOUT\_COMPLETED (when the payment is complete) or FedaPay.DIALOG\_DISMISSED (when the dialog box is closed by the user). The second argument is the transaction object created during payment.
## Domain Authorization for Checkout JS
When your merchant site connects to the **FedaPay Checkout** solution for the first time, domain authorization is required. This step ensures that your customers are properly redirected to your secure payment page, and not to the FedaPay account creation interface.
#### Why is this authorization crucial ?
Without prior authorization of your domain:
* Your customers will be redirected to the FedaPay signup interface,
* They will **not be able to complete their payments**,
* This can lead to a **loss of conversions**.
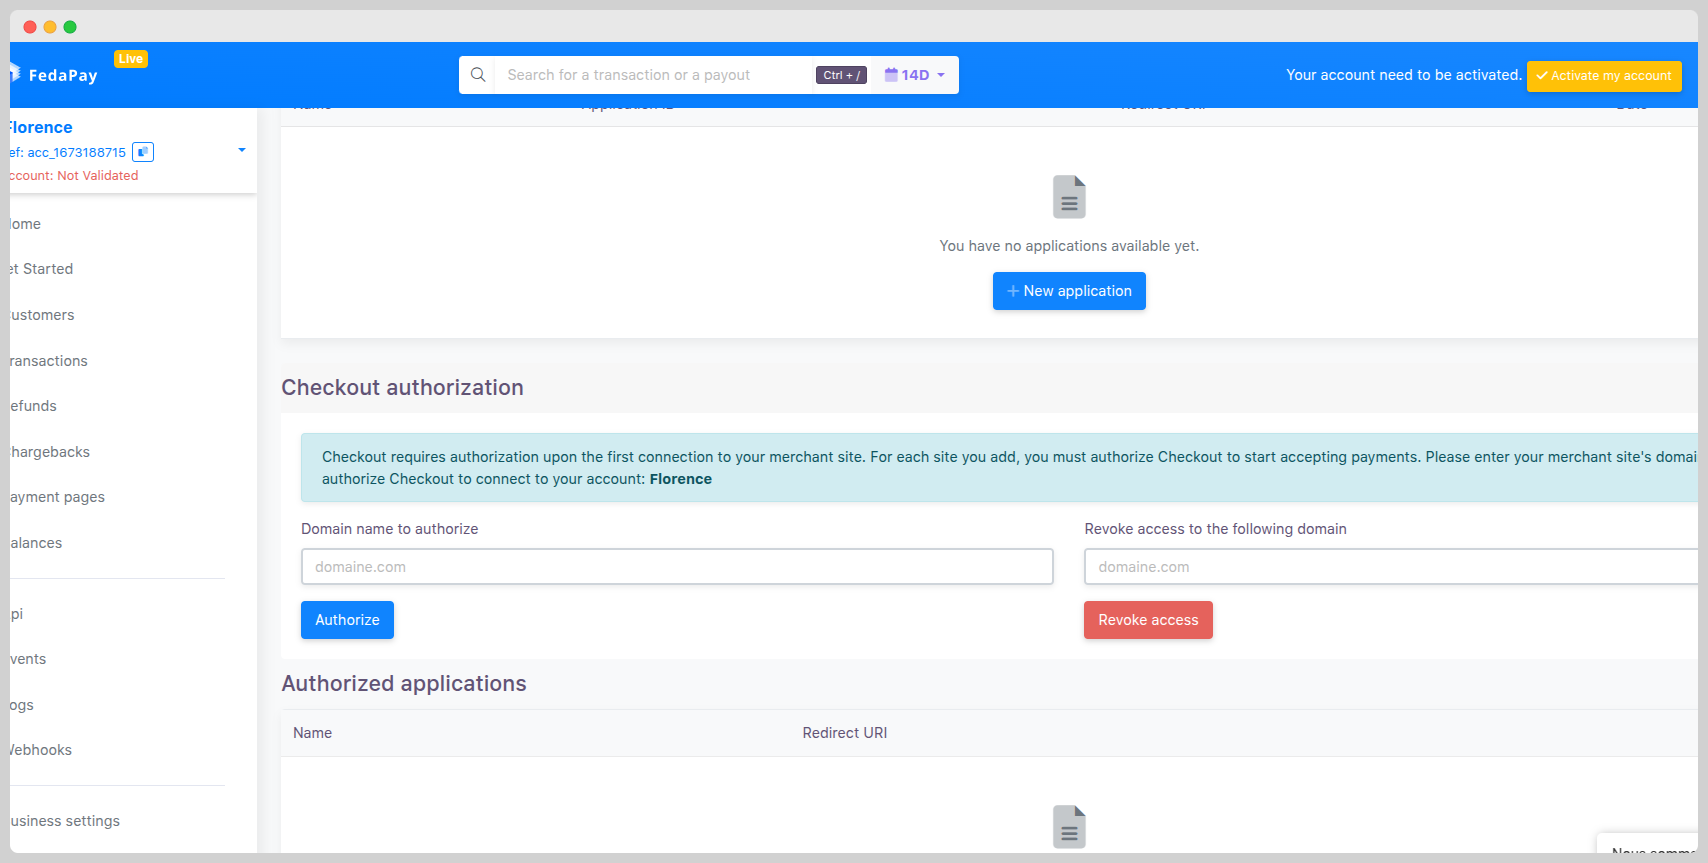
### Steps to authorize your domain
1. **Log in to your FedaPay account**
2. Click on your **profile photo** (top right)
3. Select the **Applications** menu
4. In the section **Domain name to authorize**:
* Enter the domain name of your merchant site (e.g. **yourwebsite.com**)
* Click the **Authorize** button
Once this step is completed, your domain is approved for use with Checkout JS.
### Revoking a domain (optional)
In some cases, you may want to remove access for an authorized domain – for example:
* If you have changed your main site or domain,
* If you detect unauthorized or suspicious usage.
To do this:
1. Still go to the **Applications** tab
2. Enter the relevant domain name in the field **Revoke access to the following domain**
3. Click the **Revoke access** button
**Note** : Once the revocation is done, payments from this domain will be blocked.
 * Enter the domain name of your merchant site (e.g. **yourwebsite.com**)
* Click the **Authorize** button
Once this step is completed, your domain is approved for use with Checkout JS.
### Revoking a domain (optional)
In some cases, you may want to remove access for an authorized domain – for example:
* If you have changed your main site or domain,
* If you detect unauthorized or suspicious usage.
To do this:
1. Still go to the **Applications** tab
2. Enter the relevant domain name in the field **Revoke access to the following domain**
3. Click the **Revoke access** button
* Enter the domain name of your merchant site (e.g. **yourwebsite.com**)
* Click the **Authorize** button
Once this step is completed, your domain is approved for use with Checkout JS.
### Revoking a domain (optional)
In some cases, you may want to remove access for an authorized domain – for example:
* If you have changed your main site or domain,
* If you detect unauthorized or suspicious usage.
To do this:
1. Still go to the **Applications** tab
2. Enter the relevant domain name in the field **Revoke access to the following domain**
3. Click the **Revoke access** button